 如何写一个 Postcss 插件
PostCss 类似于一个编译器,可以将样式源码编译成最终的 CSS 代码。其核心与 babel 的工作原理相类似,都是基于插件机制的。PostCSS 接收原始的 CSS 代码,并通过插件对代码进行转换。每个插件都会将原始的 CSS 代码转换成新的代码,然后将其传递给下一个插件,直到所有插件处理完毕。最终,PostCSS 会将处理后的代码输出。
每个插件都需要定义自己的转换函数,这个函数接收两个参数:CSS 代码和一些选项。在转换函数中,插件可以通过正则表达式或解析器将 CSS 代码转换成新的代码,并将其返回。插件还可以修改选项以便在后续的转换中使用。
在使用 PostCSS 时,用户需要先安装 PostCSS 和所需的插件,然后创建配置文件并在其中定义所需的插件。最后,用户可以使用命令行工具或构建工具(如 webpack 或 gulp)来运行 PostCSS,并将其应用于 CSS 文件。
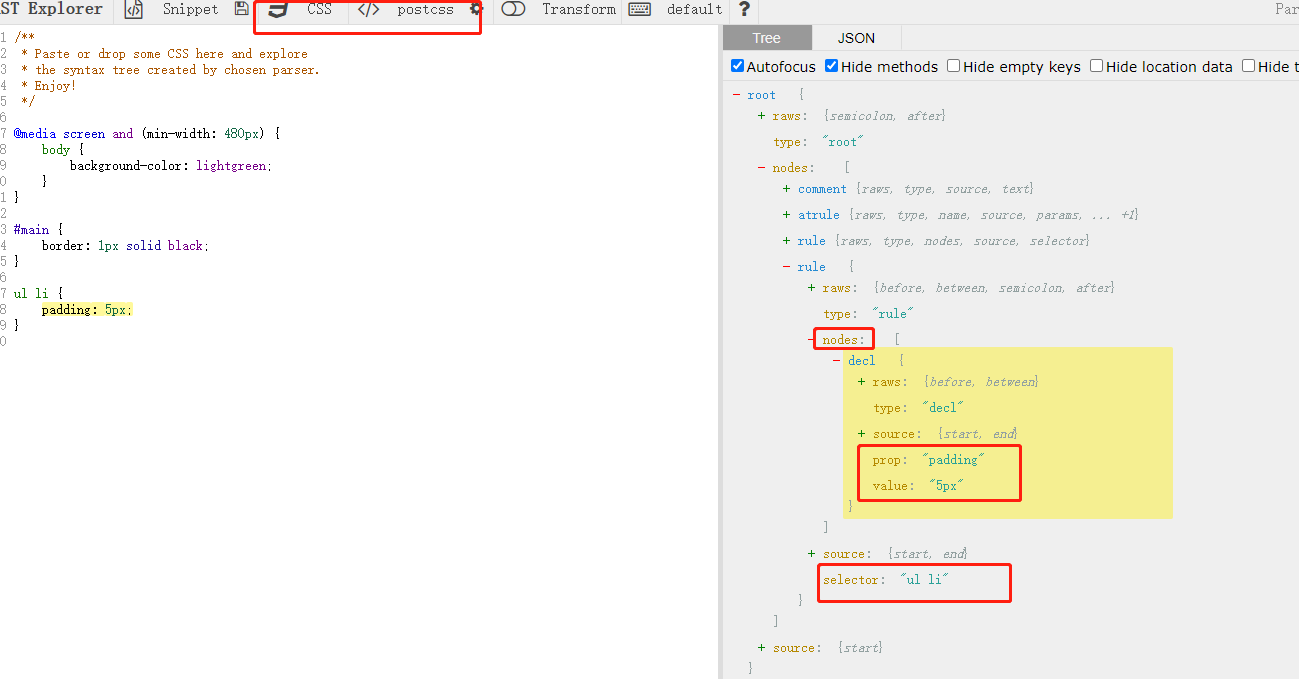
那么对于 Postcss 的转换,其实其转换的类型比 babel 更加简单,我们可以登录https://astexplorer.net/ (opens new window)看其转换的形式:

postcss 插件是工作在 transform 阶段,处理 ast 节点,以下是编写插件的步骤;
- 创建一个新的 npm 包,并初始化一个 package.json 文件:
npm init
2.安装 PostCSS 和相关插件作为开发依赖项:
npm install postcss postcss-plugin-declaration-sort --save-dev
- 在项目根目录创建一个新文件夹,用于存放插件代码。创建一个新的 JS 文件,命名为你的插件名:
mkdir my-postcss-plugin && cd my-postcss-plugin

touch index.js
2
3
- 在 index.js 文件中编写你的插件代码。一个最简单的例子可以是:
module.exports = (options = {}) => {
  return {
    // 插件的名字
    postcssPlugin: "my-plugin",
    Declaration(decl) {
      // 修改CSS声明的代码
    },
    Rule(node) {},
    AtRule(node) {},
  };
};

module.exports.postcss = true;
2
3
4
5
6
7
8
9
10
11
12
13
在这个例子中,我们定义了一个函数,接收 options 配置并返回一个对象,这个对象声明对什么节点做处理,即例子中包含了一个 postcssPlugin 属性,和一个 Declaration 方法。Declaration 方法会在每个 CSS 声明被处理时被调用。在这个例子中,我们可以在该方法中修改 CSS 声明。
- 在 package.json 文件中定义你的插件。将你的插件添加到 postcss.plugins 数组中:
"postcss": {
  "plugins": {
    "my-plugin": {}
  }
}
2
3
4
5
- 编写测试代码。在一个新的文件夹中,创建一个新的 CSS 文件和一个新的 JS 文件,用于测试你的插件:
mkdir test && cd test

touch input.css output.css test.js
2
3
在 input.css 文件中添加一些 CSS 代码,然后在 test.js 文件中编写测试代码来测试你的插件。
- 运行测试。在命令行中运行以下命令来测试你的插件:
npx postcss input.css -o output.css
接下来我们可以写个简易的 px 转 rem 插件练练手。
首先我们来定义一下插件的结构:
const plugin = (options = {}) => {
  return {
    postcssPlugin: "px-transform-to-rem",

    Declaration(node) {
      decl.value = decl.value.replace(/px/, "rem");
    },
  };
};
2
3
4
5
6
7
8
9
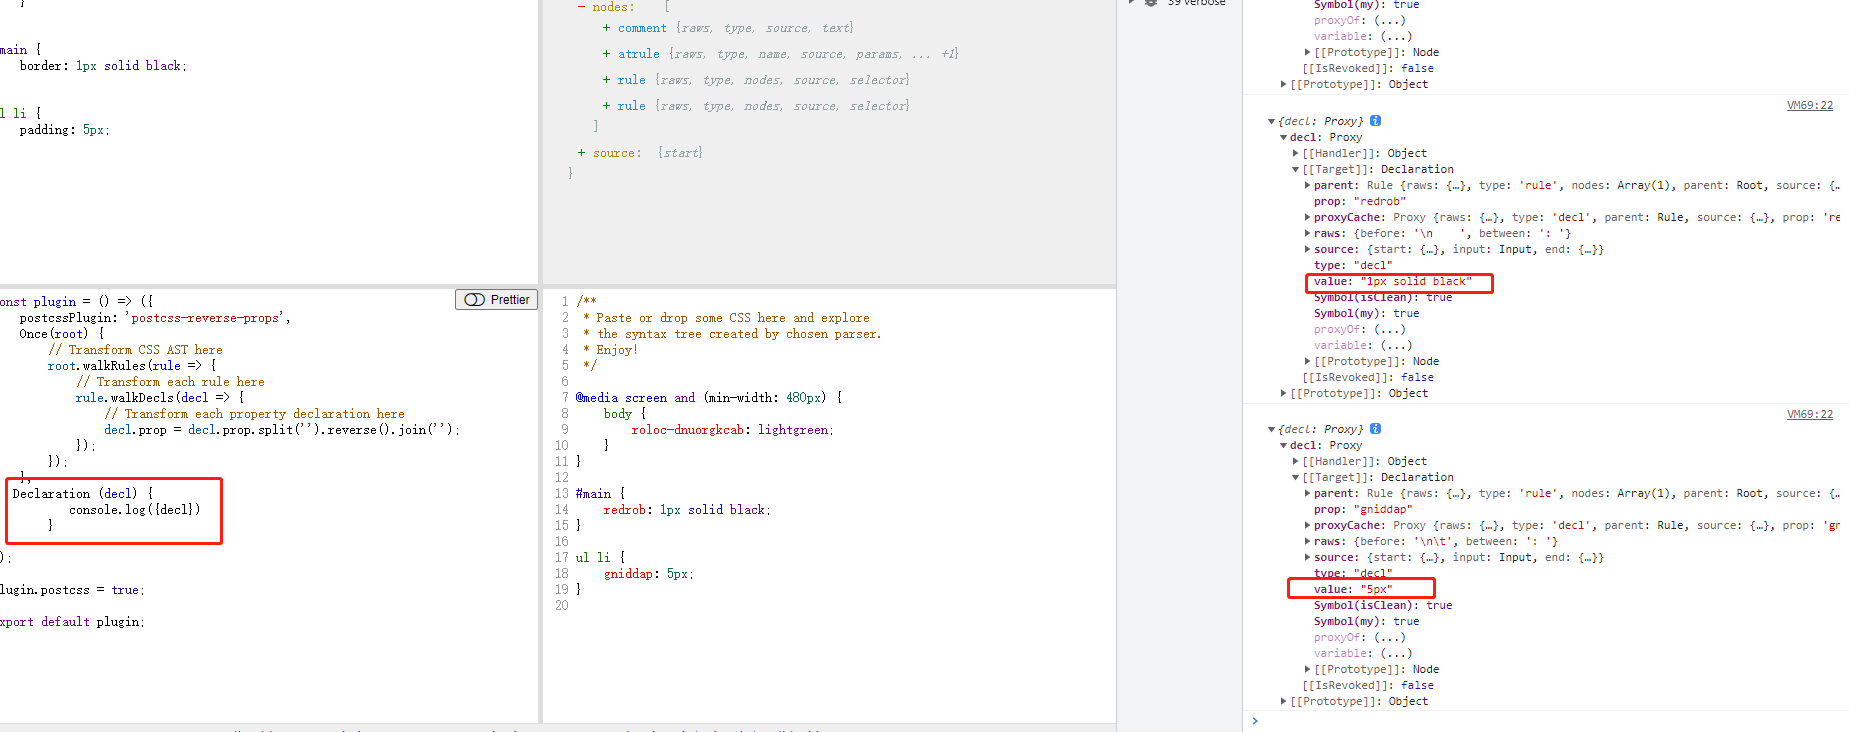
我们只需要使用 Declaration 处理的 listener 即可,可以由下图看到,我们能获取到每一个 css 样式内的值。

这是我们测试的例子
@media screen and (min-width: 480px) {
  body {
    background-color: lightgreen;
  }
}

#main {
  border: 1px solid black;
}

ul li {
  padding: 5px;
}

// 我们现在试一下,可以看到其结果会变成
@media screen and (min-width: 480px) {
  body {
    roloc-dnuorgkcab: lightgreen;
  }
}

#main {
  redrob: 1rem solid black;
}

ul li {
  gniddap: 5rem;
}
2
3
4
5
6
7
8
9
10
11
12
13
14
15
16
17
18
19
20
21
22
23
24
25
26
27
28
接下来我们来丰富这个插件的内容,我们知道,rem 的本质就是等比缩放,相对于 html 元素的 font-size, 我们可以通过 options 传入 font-size 来自定义 rem 的值。
const plugin = (options) => {
  const pxReg = /(\d+)px/gi;
  return {
    postcssPlugin: "px-transform-to-rem",
    Declaration(decl) {
      decl.value = decl.value.replace(pxReg, (matchStr, num) => {
        return num / options.base + "rem";
      });
    },
  };
};
2
3
4
5
6
7
8
9
10
11
我们可以创建一个 test.js 文件测试,例如:
const postcss = require("postcss");
const plugin = require("../src/index");
postcss([
  plugin({
    base: 100,
  }),
])
  .process(/** CSS */ "baby { font-size: 100px; }")
  .then((result) => {
    console.log(result.css);
  });

// 输出: 可以看到baby类的fontsize变为了rem
// Without `from` option PostCSS could generate wrong source map and will not find Browserslist config. Set it to CSS file path or to `undefined` to prevent this warning.
//baby { font-size: 1rem; }
2
3
4
5
6
7
8
9
10
11
12
13
14
15
就此,我们就完成了一个最简单的插件。