 Promise 链
我们有一系列的异步任务要一个接一个地执行 — 例如,加载脚本。我们如何写出更好的代码呢?
Promise 提供了一些方案来做到这一点。
在本章中,我们将一起学习 promise 链。
它看起来就像这样:
new Promise(function(resolve, reject) {

  setTimeout(() => resolve(1), 1000); // (*)

}).then(function(result) { // (**)

  alert(result); // 1
  return result * 2;

}).then(function(result) { // (***)

  alert(result); // 2
  return result * 2;

}).then(function(result) {

  alert(result); // 4
  return result * 2;

});
2
3
4
5
6
7
8
9
10
11
12
13
14
15
16
17
18
19
20
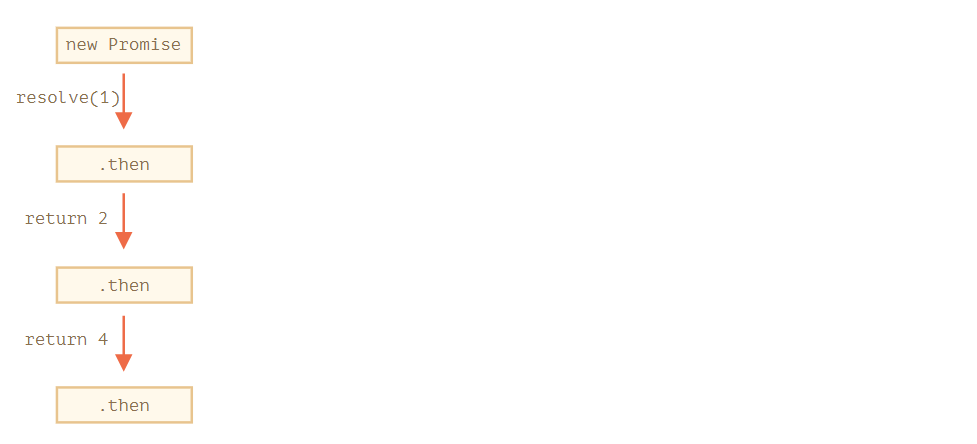
它的理念是将 result 通过 .then 处理程序(handler)链进行传递。
运行流程如下:
- 初始 promise 在 1 秒后进行 resolve
(*), - 然后
.then处理程序(handler)被调用(**)。 - 它返回的值被传入下一个
.then处理程序(handler)(***) - ……依此类推。
随着 result 在处理程序(handler)链中传递,我们可以看到一系列的 alert 调用:1 → 2 → 4。

之所以这么运行,是因为对 promise.then 的调用会返回了一个 promise,所以我们可以在其之上调用下一个 .then。
当处理程序(handler)返回一个值时,它将成为该 promise 的 result,所以将使用它调用下一个 .then。
新手常犯的一个经典错误:从技术上讲,我们也可以将多个 .then 添加到一个 promise 上。但这并不是 promise 链(chaining)。
例如:
let promise = new Promise(function(resolve, reject) {
  setTimeout(() => resolve(1), 1000);
});

promise.then(function(result) {
  alert(result); // 1
  return result * 2;
});

promise.then(function(result) {
  alert(result); // 1
  return result * 2;
});

promise.then(function(result) {
  alert(result); // 1
  return result * 2;
});
2
3
4
5
6
7
8
9
10
11
12
13
14
15
16
17
18
我们在这里所做的只是一个 promise 的几个处理程序(handler)。它们不会相互传递 result;相反,它们之间彼此独立运行处理任务。
这里它的一张示意图(你可以将其与上面的链式调用做一下比较):

在同一个 promise 上的所有 .then 获得的结果都相同 — 该 promise 的结果。所以,在上面的代码中,所有 alert 都显示相同的内容:1。
实际上我们极少遇到一个 promise 需要多处理程序(handler)的情况。使用链式调用的频率更高。
# 返回 promise
.then(handler) 中所使用的处理程序(handler)可以创建并返回一个 promise。
在这种情况下,其他的处理程序(handler)将等待它 settled 后再获得其结果(result)。
例如:
new Promise(function(resolve, reject) {

  setTimeout(() => resolve(1), 1000);

}).then(function(result) {

  alert(result); // 1

  return new Promise((resolve, reject) => { // (*)
    setTimeout(() => resolve(result * 2), 1000);
  });

}).then(function(result) { // (**)

  alert(result); // 2

  return new Promise((resolve, reject) => {
    setTimeout(() => resolve(result * 2), 1000);
  });

}).then(function(result) {

  alert(result); // 4

});
2
3
4
5
6
7
8
9
10
11
12
13
14
15
16
17
18
19
20
21
22
23
24
25
这里第一个 .then 显示 1 并在 (*) 行返回 new Promise(…)。1 秒后它会进行 resolve,然后 result(resolve 的参数,在这里它是 result*2)被传递给第二个 .then 的处理程序(handler)。这个处理程序(handler)位于 (**) 行,它显示 2,并执行相同的动作(action)。
所以输出与前面的示例相同:1 → 2 → 4,但是现在在每次 alert 调用之间会有 1 秒钟的延迟。
返回 promise 使我们能够构建异步行为链。
# 示例:loadScript
之前定义的 promise 化的 loadScript 结合使用,按顺序依次加载脚本:
loadScript("/article/promise-chaining/one.js")
  .then(function(script) {
    return loadScript("/article/promise-chaining/two.js");
  })
  .then(function(script) {
    return loadScript("/article/promise-chaining/three.js");
  })
  .then(function(script) {
    // 使用在脚本中声明的函数
    // 以证明脚本确实被加载完成了
    one();
    two();
    three();
  });
2
3
4
5
6
7
8
9
10
11
12
13
14
我们可以用箭头函数来重写代码,让其变得简短一些:
loadScript("/article/promise-chaining/one.js")
  .then(script => loadScript("/article/promise-chaining/two.js"))
  .then(script => loadScript("/article/promise-chaining/three.js"))
  .then(script => {
    // 脚本加载完成,我们可以在这儿使用脚本中声明的函数
    one();
    two();
    three();
  });
2
3
4
5
6
7
8
9
在这儿,每个 loadScript 调用都返回一个 promise,并且在它 resolve 时下一个 .then 开始运行。然后,它启动下一个脚本的加载。所以,脚本是一个接一个地加载的。
我们可以向链中添加更多的异步行为(action)。请注意,代码仍然是“扁平”的 — 它向下增长,而不是向右。这里没有“厄运金字塔”的迹象。
从技术上讲,我们可以向每个 loadScript 直接添加 .then,就像这样:
loadScript("/article/promise-chaining/one.js").then(script1 => {
  loadScript("/article/promise-chaining/two.js").then(script2 => {
    loadScript("/article/promise-chaining/three.js").then(script3 => {
      // 此函数可以访问变量 script1,script2 和 script3
      one();
      two();
      three();
    });
  });
});
2
3
4
5
6
7
8
9
10
这段代码做了相同的事儿:按顺序加载 3 个脚本。但它是“向右增长”的。所以会有和使用回调函数一样的问题。
刚开始使用 promise 的人可能不知道 promise 链,所以他们就这样写了。通常,链式是首选。
有时候直接写 .then 也是可以的,因为嵌套的函数可以访问外部作用域。在上面的例子中,嵌套在最深层的那个回调(callback)可以访问所有变量 script1,script2 和 script3。但这是一个例外,而不是一条规则。
Thenables
确切地说,处理程序(handler)返回的不完全是一个 promise,而是返回的被称为 “thenable” 对象 — 一个具有方法
.then的任意对象。它会被当做一个 promise 来对待。这个想法是,第三方库可以实现自己的“promise 兼容(promise-compatible)”对象。它们可以具有扩展的方法集,但也与原生的 promise 兼容,因为它们实现了
.then方法。这是一个 thenable 对象的示例:
class Thenable {
  constructor(num) {
    this.num = num;
  }
  then(resolve, reject) {
    alert(resolve); // function() { native code }
    // 1 秒后使用 this.num*2 进行 resolve
    setTimeout(() => resolve(this.num * 2), 1000); // (**)
  }
}

new Promise(resolve => resolve(1))
  .then(result => {
    return new Thenable(result); // (*)
  })
  .then(alert); // 1000ms 后显示 2
1
2
3
4
5
6
7
8
9
10
11
12
13
14
15
16JavaScript 检查在
(*)行中由.then处理程序(handler)返回的对象:如果它具有名为then的可调用方法,那么它将调用该方法并提供原生的函数resolve和reject作为参数(类似于 executor),并等待直到其中一个函数被调用。在上面的示例中,resolve(2)在 1 秒后被调用(**)。然后,result 会被进一步沿着链向下传递。这个特性允许我们将自定义的对象与 promise 链集成在一起,而不必继承自
Promise。
# 更复杂的示例:fetch
在前端编程中,promise 通常被用于网络请求。那么,让我们一起来看一个相关的扩展示例吧。
我们将使用 fetch (opens new window) 方法从远程服务器加载用户信息。它有很多可选的参数,我们在 单独的一章 (opens new window) 中对其进行了详细介绍,但是基本语法很简单:
let promise = fetch(url);
执行这条语句,向 url 发出网络请求并返回一个 promise。当远程服务器返回 header(是在 全部响应加载完成前)时,该 promise 使用一个 response 对象来进行 resolve。
为了读取完整的响应,我们应该调用 response.text() 方法:当全部文字(full text)内容从远程服务器下载完成后,它会返回一个 promise,该 promise 以刚刚下载完成的这个文本作为 result 进行 resolve。
下面这段代码向 user.json 发送请求,并从服务器加载该文本:
fetch('/article/promise-chaining/user.json')
  // 当远程服务器响应时,下面的 .then 开始执行
  .then(function(response) {
    // 当 user.json 加载完成时,response.text() 会返回一个新的 promise
    // 该 promise 以加载的 user.json 为 result 进行 resolve
    return response.text();
  })
  .then(function(text) {
    // ...这是远程文件的内容
    alert(text); // {"name": "iliakan", "isAdmin": true}
  });
2
3
4
5
6
7
8
9
10
11
从 fetch 返回的 response 对象还包括 response.json() 方法,该方法读取远程数据并将其解析为 JSON。在我们的例子中,这更加方便,所以让我们切换到这个方法。
为了简洁,我们还将使用箭头函数:
// 同上,但是使用 response.json() 将远程内容解析为 JSON
fetch('/article/promise-chaining/user.json')
  .then(response => response.json())
  .then(user => alert(user.name)); // iliakan, got user name
2
3
4
现在,让我们用加载好的用户信息搞点事情。
例如,我们可以再向 GitHub 发送一个请求,加载用户个人资料并显示头像:
// 发送一个对 user.json 的请求
fetch('/article/promise-chaining/user.json')
  // 将其加载为 JSON
  .then(response => response.json())
  // 发送一个到 GitHub 的请求
  .then(user => fetch(`https://api.github.com/users/${user.name}`))
  // 将响应加载为 JSON
  .then(response => response.json())
  // 显示头像图片(githubUser.avatar_url)3 秒(也可以加上动画效果)
  .then(githubUser => {
    let img = document.createElement('img');
    img.src = githubUser.avatar_url;
    img.className = "promise-avatar-example";
    document.body.append(img);

    setTimeout(() => img.remove(), 3000); // (*)
  });
2
3
4
5
6
7
8
9
10
11
12
13
14
15
16
17
这段代码可以工作,具体细节请看注释。但是,这儿有一个潜在的问题,一个新手使用 promise 的典型问题。
请看 (*) 行:我们如何能在头像显示结束并被移除 之后 做点什么?例如,我们想显示一个用于编辑该用户或者其他内容的表单。就目前而言,是做不到的。
为了使链可扩展,我们需要返回一个在头像显示结束时进行 resolve 的 promise。
就像这样:
fetch('/article/promise-chaining/user.json')
  .then(response => response.json())
  .then(user => fetch(`https://api.github.com/users/${user.name}`))
  .then(response => response.json())
  .then(githubUser => new Promise(function(resolve, reject) { // (*)
    let img = document.createElement('img');
    img.src = githubUser.avatar_url;
    img.className = "promise-avatar-example";
    document.body.append(img);

    setTimeout(() => {
      img.remove();
      resolve(githubUser); // (**)
    }, 3000);
  }))
  // 3 秒后触发
  .then(githubUser => alert(`Finished showing ${githubUser.name}`));
2
3
4
5
6
7
8
9
10
11
12
13
14
15
16
17
也就是说,第 (*) 行的 .then 处理程序(handler)现在返回一个 new Promise,只有在 setTimeout 中的 resolve(githubUser) (**) 被调用后才会变为 settled。链中的下一个 .then 将一直等待这一时刻的到来。
作为一个好的做法,异步行为应该始终返回一个 promise。这样就可以使得之后我们计划后续的行为成为可能。即使我们现在不打算对链进行扩展,但我们之后可能会需要。
最后,我们可以将代码拆分为可重用的函数:
function loadJson(url) {
  return fetch(url)
    .then(response => response.json());
}

function loadGithubUser(name) {
  return fetch(`https://api.github.com/users/${name}`)
    .then(response => response.json());
}

function showAvatar(githubUser) {
  return new Promise(function(resolve, reject) {
    let img = document.createElement('img');
    img.src = githubUser.avatar_url;
    img.className = "promise-avatar-example";
    document.body.append(img);

    setTimeout(() => {
      img.remove();
      resolve(githubUser);
    }, 3000);
  });
}

// 使用它们:
loadJson('/article/promise-chaining/user.json')
  .then(user => loadGithubUser(user.name))
  .then(showAvatar)
  .then(githubUser => alert(`Finished showing ${githubUser.name}`));
  // ...
2
3
4
5
6
7
8
9
10
11
12
13
14
15
16
17
18
19
20
21
22
23
24
25
26
27
28
29
30
# 总结
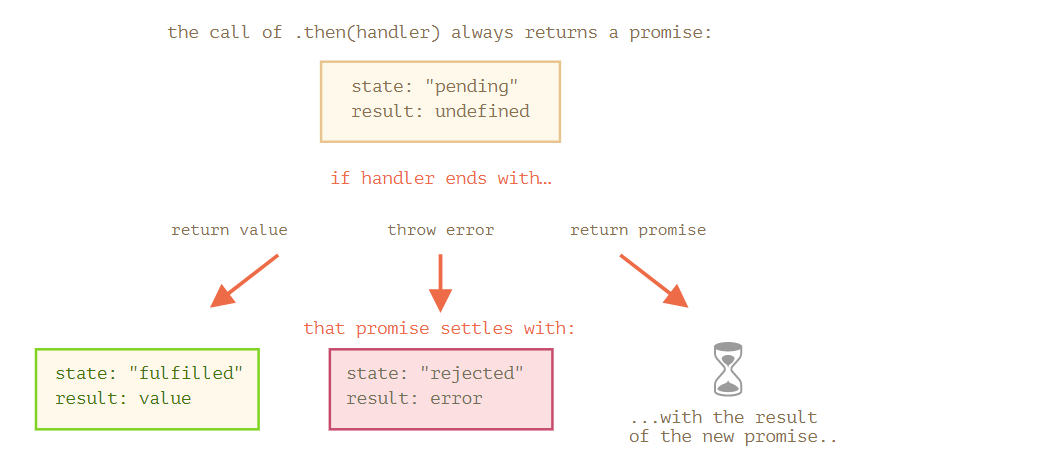
如果 .then(或 catch/finally 都可以)处理程序(handler)返回一个 promise,那么链的其余部分将会等待,直到它状态变为 settled。当它被 settled 后,其 result(或 error)将被进一步传递下去。
这是一个完整的流程图:

# 实例
# Promise:then 对比 catch
这两个代码片段是否相等?换句话说,对于任何处理程序(handler),它们在任何情况下的行为都相同吗?
promise.then(f1).catch(f2);
对比:
promise.then(f1, f2);
# 解决方案
简要回答就是:不,它们不相等:
不同之处在于,如果
f1中出现 error,那么在这儿它会被.catch处理:promise .then(f1) .catch(f2);1
2
3……在这儿则不会:
promise
  .then(f1, f2);
1
2这是因为 error 是沿着链传递的,而在第二段代码中,
f1下面没有链。换句话说,
.then将 result/error 传递给下一个.then/.catch。所以在第一个例子中,在下面有一个catch,而在第二个例子中并没有catch,所以 error 未被处理。