 Vue2的生命周期
# Vue生命周期
什么是vue生命周期
Vue 实例从创建到销毁的过程,就是生命周期。
也就是从开始创建、初始化数据、编译模板、挂载DOM-渲染、更新-渲染、卸载等一系列的过程,我们称这是 Vue 的生命周期。
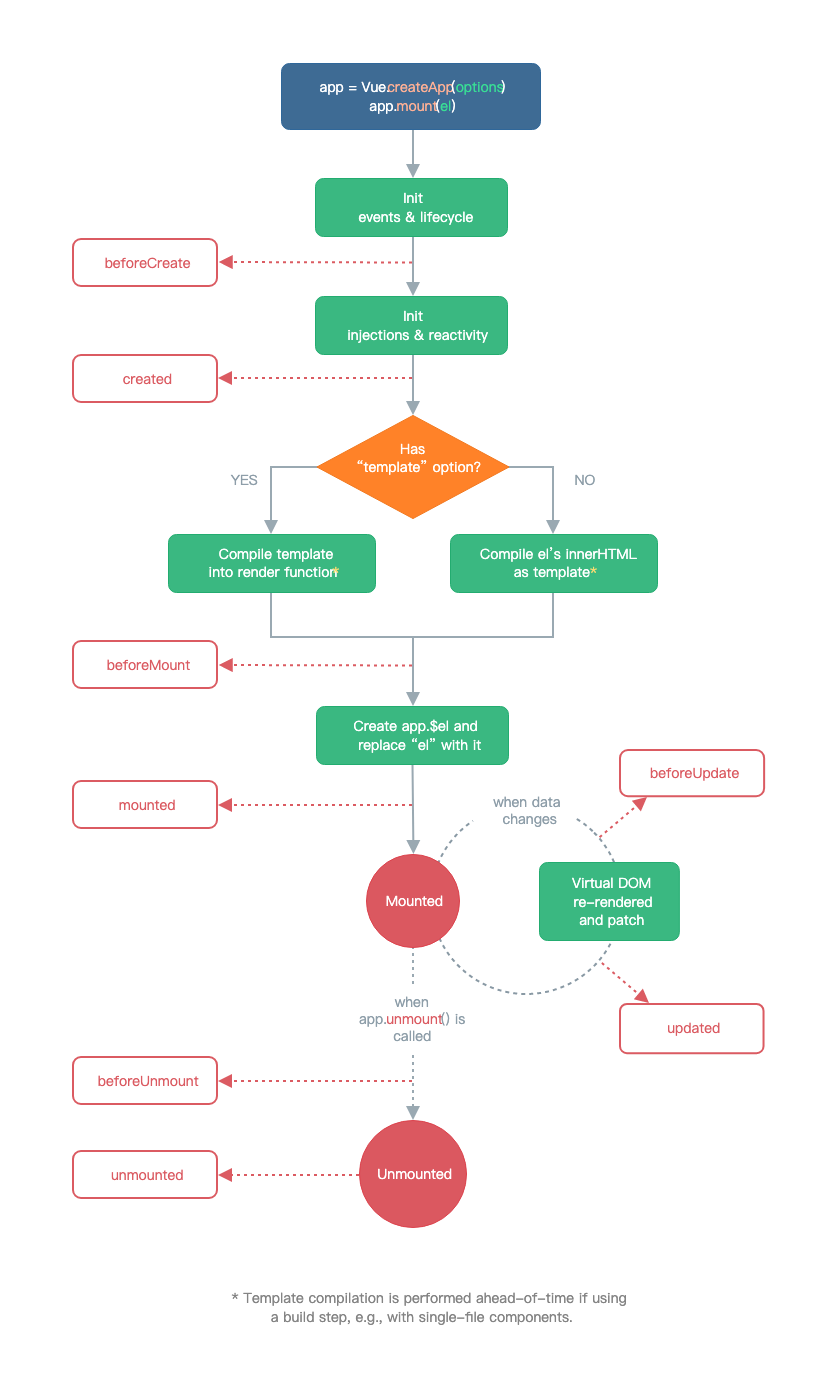
- beforeCreate
- created
- beforeMount
- mounted
- beforeUpdate
- updated
- beforeDestroy
- destroyed
created、 mounted、updated、destroyed
# 第一次页面加载会触发哪几个钩子?
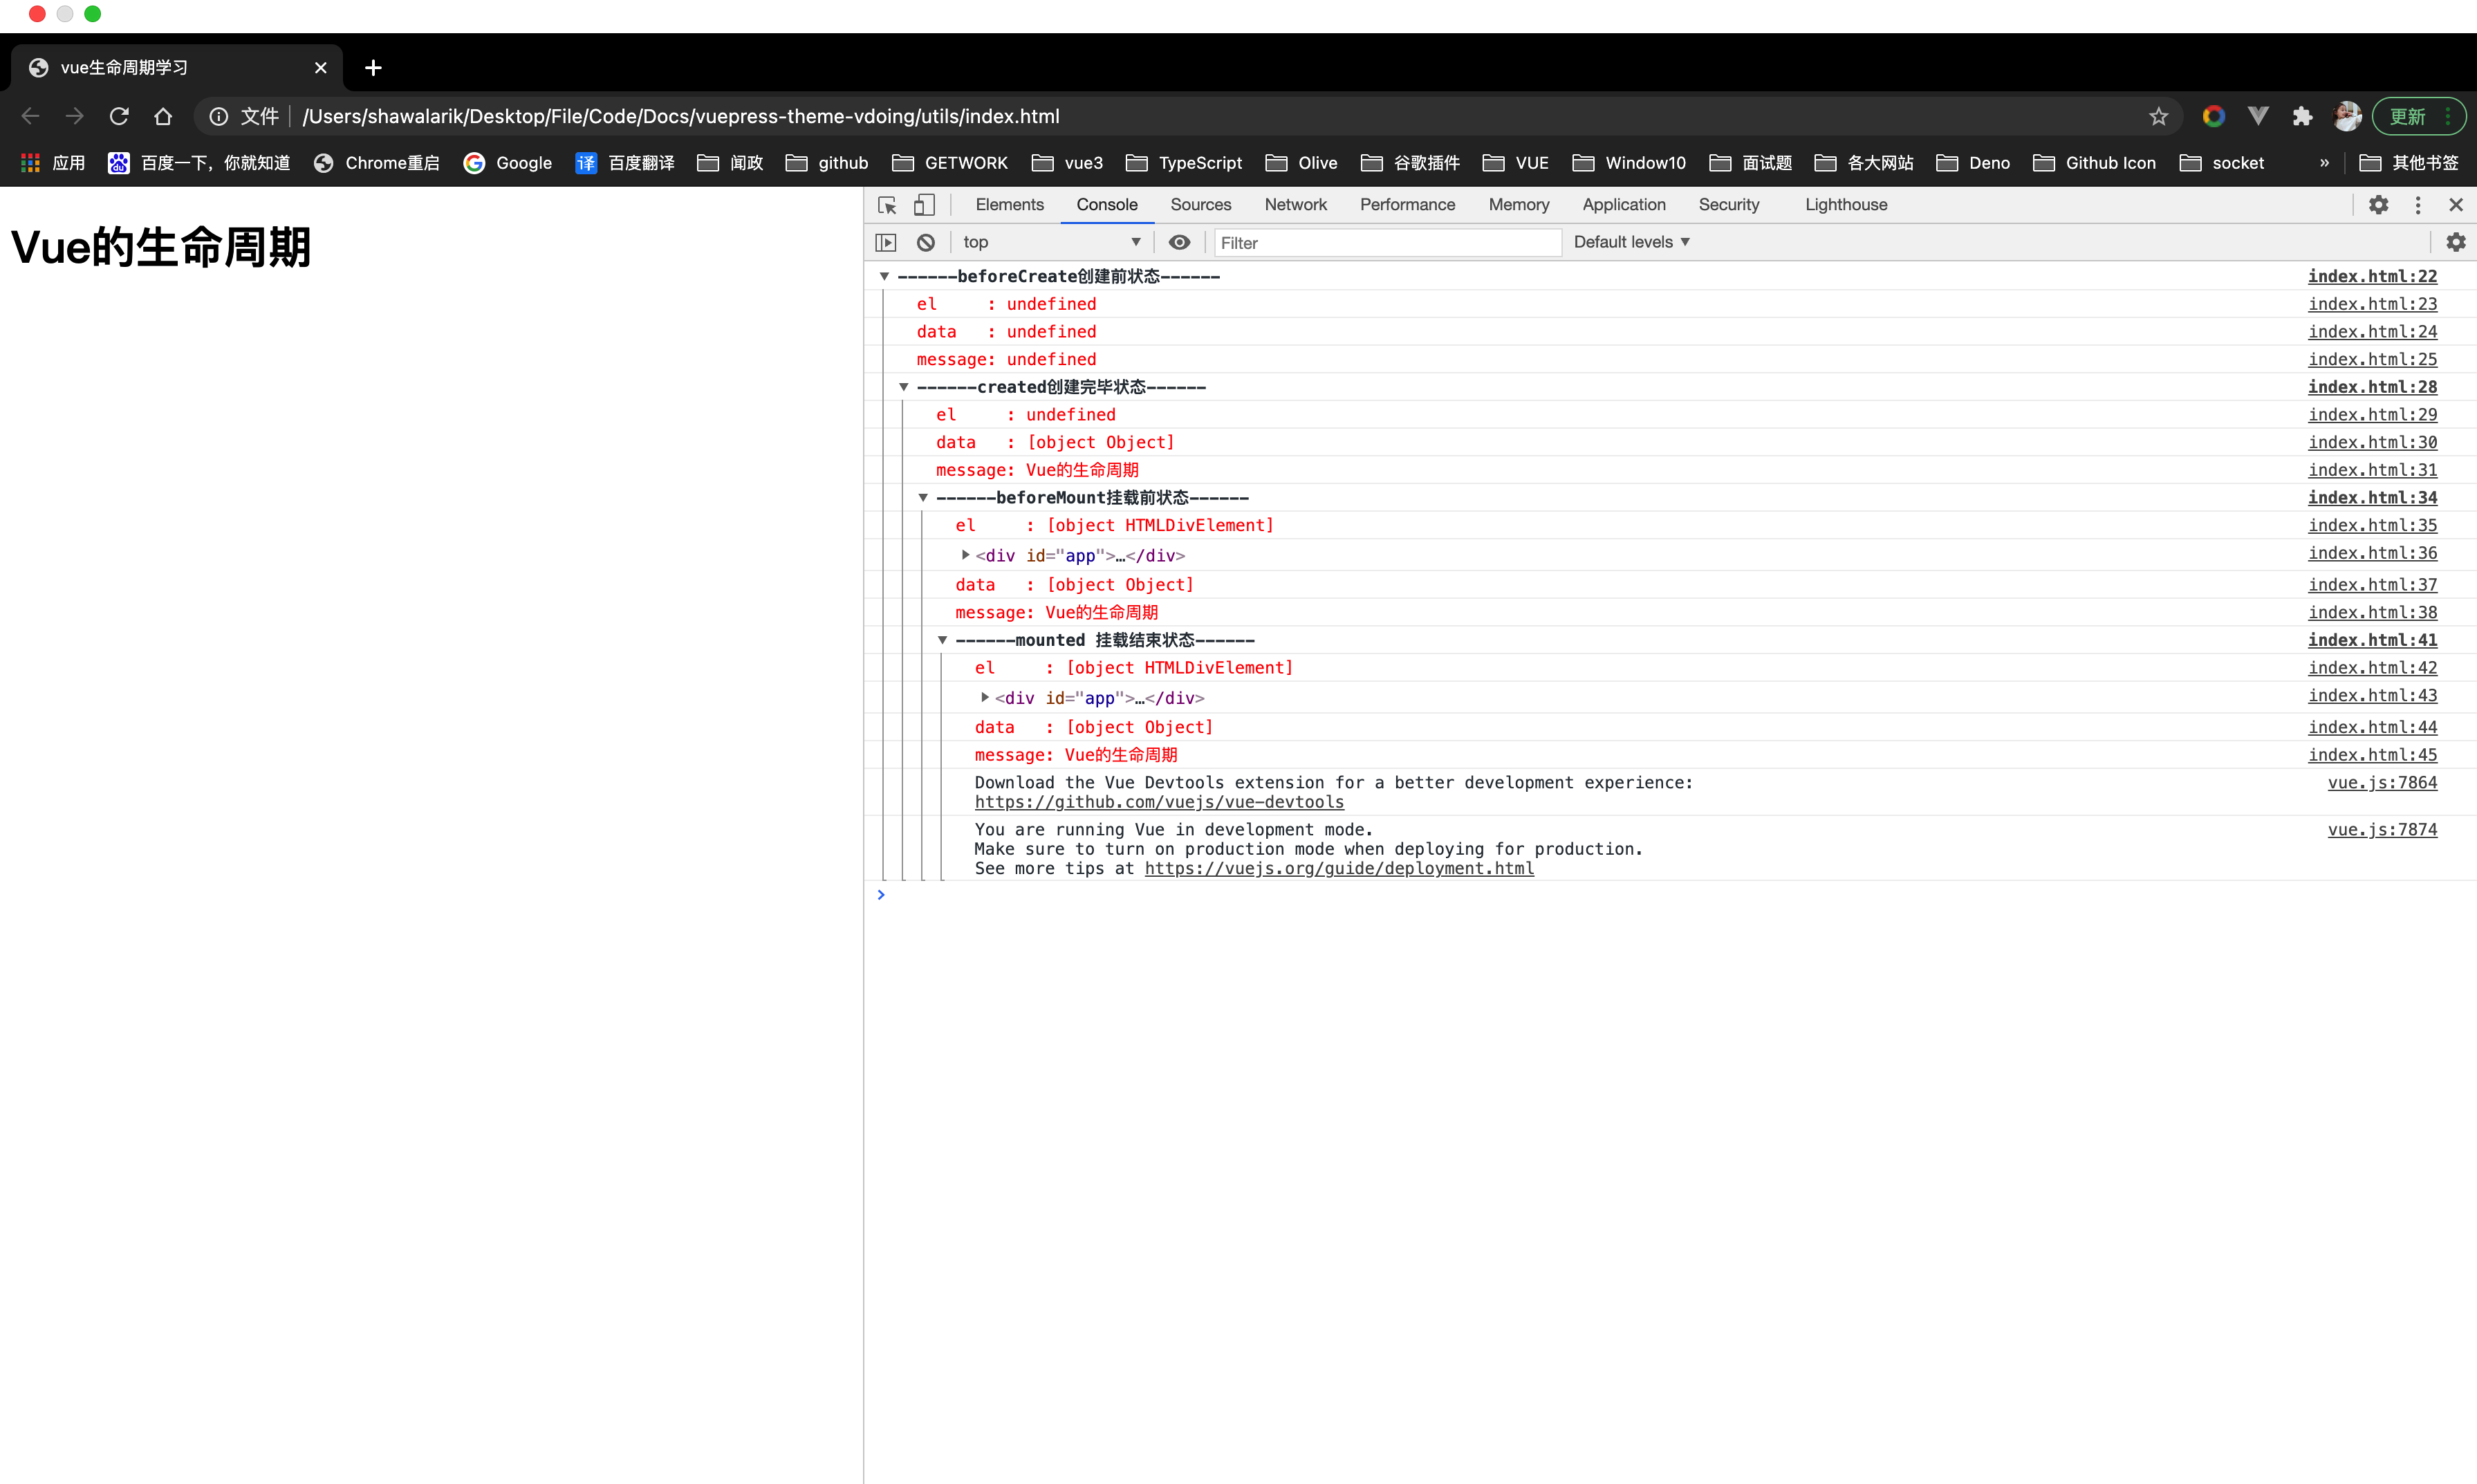
beforeCreate , created , beforeMount ,mounted这几个钩子
将下方代码复制在浏览器中运行,打开 console 查看就行了:
<!DOCTYPE html>
<html lang="en">
  <head>
    <meta charset="UTF-8" />
    <meta name="viewport" content="width=device-width, initial-scale=1.0" />
    <meta http-equiv="X-UA-Compatible" content="ie=edge" />
    <title>vue生命周期学习</title>
    <script src="https://cdn.bootcss.com/vue/2.4.2/vue.js"></script>
  </head>
  <body>
    <div id="app">
      <h1>{{message}}</h1>
    </div>
  </body>
  <script>
    var vm = new Vue({
      el: "#app",
      data: {
        message: "Vue的生命周期",
      },
      beforeCreate: function () {
        console.group("------beforeCreate创建前状态------");
        console.log("%c%s", "color:red", "el     : " + this.$el); //undefined
        console.log("%c%s", "color:red", "data   : " + this.$data); //undefined
        console.log("%c%s", "color:red", "message: " + this.message);
      },
      created: function () {
        console.group("------created创建完毕状态------");
        console.log("%c%s", "color:red", "el     : " + this.$el); //undefined
        console.log("%c%s", "color:red", "data   : " + this.$data); //已被初始化
        console.log("%c%s", "color:red", "message: " + this.message); //已被初始化
      },
      beforeMount: function () {
        console.group("------beforeMount挂载前状态------");
        console.log("%c%s", "color:red", "el     : " + this.$el); //已被初始化
        console.log(this.$el);
        console.log("%c%s", "color:red", "data   : " + this.$data); //已被初始化
        console.log("%c%s", "color:red", "message: " + this.message); //已被初始化
      },
      mounted: function () {
        console.group("------mounted 挂载结束状态------");
        console.log("%c%s", "color:red", "el     : " + this.$el); //已被初始化
        console.log(this.$el);
        console.log("%c%s", "color:red", "data   : " + this.$data); //已被初始化
        console.log("%c%s", "color:red", "message: " + this.message); //已被初始化
      },
      beforeUpdate: function () {
        console.group("beforeUpdate 更新前状态===============》");
        console.log("%c%s", "color:red", "el     : " + this.$el);
        console.log(this.$el);
        console.log("%c%s", "color:red", "data   : " + this.$data);
        console.log("%c%s", "color:red", "message: " + this.message);
      },
      updated: function () {
        console.group("updated 更新完成状态===============》");
        console.log("%c%s", "color:red", "el     : " + this.$el);
        console.log(this.$el);
        console.log("%c%s", "color:red", "data   : " + this.$data);
        console.log("%c%s", "color:red", "message: " + this.message);
      },
      beforeDestroy: function () {
        console.group("beforeDestroy 销毁前状态===============》");
        console.log("%c%s", "color:red", "el     : " + this.$el);
        console.log(this.$el);
        console.log("%c%s", "color:red", "data   : " + this.$data);
        console.log("%c%s", "color:red", "message: " + this.message);
      },
      destroyed: function () {
        console.group("destroyed 销毁完成状态===============》");
        console.log("%c%s", "color:red", "el     : " + this.$el);
        console.log(this.$el);
        console.log("%c%s", "color:red", "data   : " + this.$data);
        console.log("%c%s", "color:red", "message: " + this.message);
      },
    });
  </script>
</html>
2
3
4
5
6
7
8
9
10
11
12
13
14
15
16
17
18
19
20
21
22
23
24
25
26
27
28
29
30
31
32
33
34
35
36
37
38
39
40
41
42
43
44
45
46
47
48
49
50
51
52
53
54
55
56
57
58
59
60
61
62
63
64
65
66
67
68
69
70
71
72
73
74
75
76
77
阐述每个周期具体做哪些场景?
# beforeCreate
创建前,此阶段实例初始化之后,this指向创建的实例,此时的数据观察事件机制都未形成,不能获得DOM节点。
data、computed、watch、methods上的方法和数据均不能访问。可以在这里添加loading事件。
一般不使用此方法
# created
创建后,此阶段为实例已经创建,完成数据(data、prop、computed)的初始化导入依赖项。
可访问data、computed、watch、metheds上的方法和数据。
初始化完成时的事件写在这里,异步请求也适宜在这里调用(请求不宜过多,避免白屏时间太长)。
可以在这里结束loading事件,还可以做一些初始化,实现函数自执行。
未挂载DOM,若在此阶段进行DOM操作一定要放在Vue.nextTick()的回调函数中。
原因是在 created()钩子函数执行的时候
DOM其实并未进行任何渲染,而此时进行DOM操作无异于徒劳,所以此处一定要将DOM操作的 js 代码放进Vue.nextTick()的回调函数中。与之对应的就是
mounted钩子函数,因为该钩子函数执行时所有的DOM挂载已完成。nextTick(),是将回调函数延迟在下一次dom更新数据后调用当数据更新了,在 dom 中渲染后,自动执行该函数
# beforeMount
挂载前,虽然得不到具体的DOM元素,但vue挂载的根节点已经创建,下面vue对DOM的操作将围绕这个根元素继续进行。
beforeMount这个阶段时过渡性的,一般一个项目只能用到一两次。
# mounted
挂载,完成创建vm.$el,和双向绑定。
完成挂载DOM和渲染,可在mounted钩子函数中对挂载 对DOM进行操作。
可在这发起后端请求,拿回数据,配合路由钩子函数做一些事情。
# beforeUpdate
数据更新前,数据驱动DOM。
在数据更新后虽然没有立即更新数据,但是DOM中的数据会改变,这是vue双向绑定的作用。
可在更新前访问现有的DOM,如手动移除添加事件监听器。
# updated
数据更新后,完成虚拟DOM的重新渲染和打补丁。
组件DOM已完成更新,可执行依赖的DOM操作。
注意:不要在此函数中操作数据(修改属性),会陷入死循环。
# beforeDestroy
销毁前。
可做一些删除提示,如:您确定删除xx吗?
# destroyed
销毁后,当前组件已被销毁,销毁监听事件,组件、事件、子实例也被销毁。
这时组件已经没有了,无法操作里面的任何东西了。
除了包括官方图解上的八种周期之外,我又在API中发现了另外两种类似的钩子。
# activated
在使用vue-router时有时需要使用<keep-alive></keep-alive>来缓存组件状态,这个时候created钩子就不会被重复调用了。
如果我们的子组件需要在每次加载的时候进行某些操作,可以使用activated钩子触发。
# deactivated
<keep-alive></keep-alive>组件被移除时使用。
# Vue 的父组件和子组件生命周期钩子执行顺序是什么?
# 执行顺序
- 加载渲染过程:
父 beforeCreate->父 created->父 beforeMount->子 beforeCreate->子 created->子 beforeMount->子 mounted->父 mounted; - 子组件更新过程:
父 beforeUpdate->子 beforeUpdate->子 updated->父 updated; - 父组件更新过程:
父 beforeUpdate->父 updated; - 销毁过程:
父 beforeDestroy->子 beforeDestroy->子 destroyed->父 destroyed;
# 执行过程
- 如果子组件有兄弟组件,则兄弟组件依次执行到
mounted,最后执行父组件的mounted; - 当子组件全部挂在完后,父组件才会才会挂载。
- 当子组件完成挂载后,父组件还会主动执行一次
befoeUpdate/updated钩子函数(仅首次)。 - 父子组件在
data变化中是分别监控的,但是更新props中的数据是关联的。 - 销毁父组件时,先将子组件销毁才会销毁父组件。
- 兄弟组件的初始化(
mounted之前)是分开进行的,挂载是从上到下依次进行。 - 当没有数据关联时,兄弟组件之间的更新和销毁时互不关联的。